Welcome to Deepa Auto Repair's Notes Pages for repairs.
🚗 Troubleshooting DTC P16B319 Engine Coolant Control Valve (Toyota Part No: 16342-F0010)
Understanding and Fixing "Multi Flow Control Valve Motor Circuit Current Above Threshold"
⚠️ Important Disclaimer This guide provides general troubleshooting steps for the DTC P16B319. Working on your car can be dangerous. Always ensure the engine is cool before working on the cooling system. Disconnect the battery's negative terminal when performing electrical checks. If you are unsure about any step, please consult a certified mechanic. Improper repairs can lead to further damage or injury.
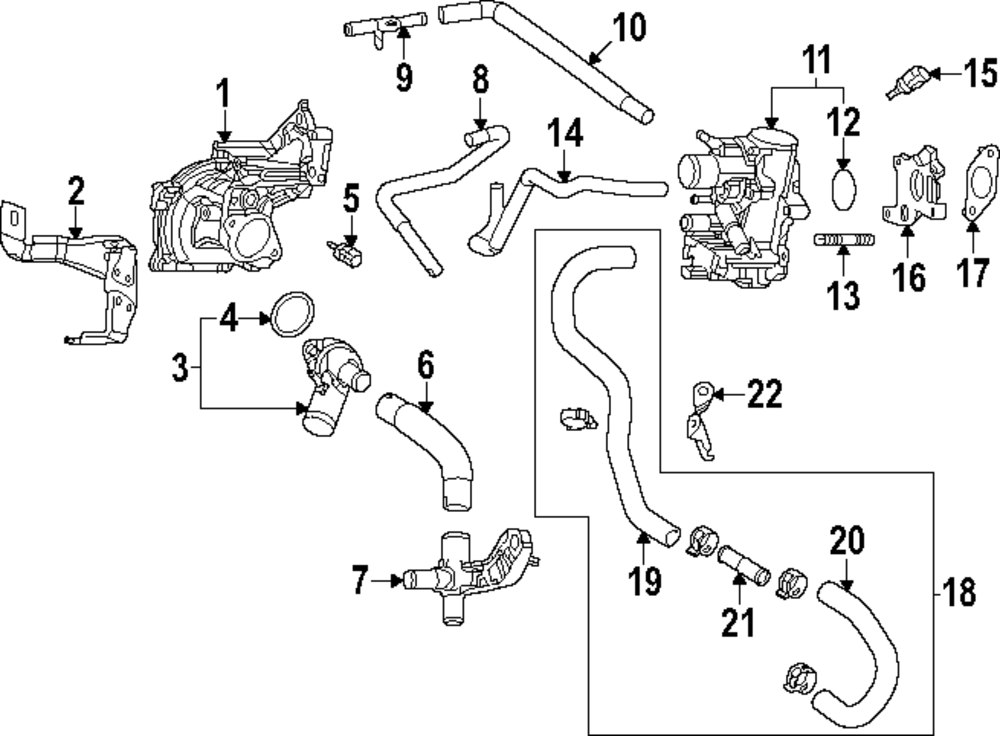
🔍 What is DTC P16B319? The Diagnostic Trouble Code (DTC) P16B319 indicates an issue with your vehicle's Multi Flow Control Valve Motor Circuit, specifically that the current is "Above Threshold." This valve, Toyota Part No: 16342-F0010, item #11 in the picture above, is crucial for managing engine coolant flow, which helps regulate engine temperature for optimal performance and fuel efficiency.
In simpler terms, your car's computer (ECU) is detecting that the electric motor inside this valve is drawing too much power, suggesting a problem with the valve itself, its wiring, or the power supply to it.
💧 Step 1: Basic Coolant System Checks Before diving into electrical components, let's ensure the cooling system itself is in good order. Sometimes, related issues can trigger seemingly unrelated codes.
1.1 Check Coolant Level Engine Off and Cool: Ensure your engine is completely cool. Never open the radiator cap when the engine is hot! Reservoir: Locate the plastic coolant reservoir (overflow tank). Check if the coolant level is between the "MIN" and "MAX" marks. If low, top it off with the correct type of coolant specified in your owner's manual. Radiator (Carefully): Once the engine is cool, carefully remove the radiator cap. The coolant should be visible and full to the neck. 1.2 Inspect Coolant Condition Color and Clarity: The coolant should be clean and clear, typically green, blue, pink, or orange depending on the type. Contamination: Look for any signs of oil (milky appearance), rust, or debris. Contaminated coolant can indicate a more serious engine issue. 1.3 Bleed the Cooling System (If you recently worked on it) Air pockets in the cooling system can cause erratic temperature readings and affect component operation. If you've recently drained or refilled the coolant, ensure the system is properly bled. Consult your car's service manual for the specific bleeding procedure. ⚡ Step 2: Electrical System Checks Since the DTC points to an electrical circuit issue, these steps are critical. You will need a multimeter for some of these checks.
2.1 Battery Voltage and Age Voltage Check: With the engine off, use a multimeter to check your battery voltage. It should be around 12.6 volts. With the engine running, it should be between 13.7 and 14.7 volts (charging voltage). Battery Age: An old or weak battery (typically over 3-5 years) can cause various electrical gremlins, including low voltage to sensitive components. Consider having your battery load-tested. Terminal Cleanliness: Ensure battery terminals are clean and free of corrosion. 2.2 Check Fuses Locate Fuse Box: Consult your owner's manual to find the fuse box(es) (usually under the hood and/or inside the cabin). Identify Fuse: Look for fuses related to the "Engine," "Cooling Fan," "ECU," or "Engine Control." The manual should specify which fuse protects the engine control valve circuit. Visual Inspection: Pull out the suspected fuse and hold it up to the light. A broken wire inside means it's blown. Multimeter Check: For a more reliable check, use your multimeter's continuity setting to test the fuse. 2.3 Inspect Wiring Visual Inspection: Trace the wiring harness leading to the Engine Coolant Control Valve (Toyota Part No: 16342-F0010). Look for any signs of damage: Fraying or exposed wires Chafing against other components Melted insulation Pinch points Signs of rodent damage Pay close attention to areas where the harness bends or passes through tight spaces. 2.4 Inspect Connectors Valve Connector: Disconnect the electrical connector at the Engine Coolant Control Valve. Pins: Look inside the connector for bent, corroded, or pushed-out pins. Ensure they are clean and make good contact. Secure Connection: Reconnect the connector firmly, ensuring it clicks into place. ⚙️ Step 3: Engine Coolant Control Valve Checks These checks require a multimeter and some understanding of electrical circuits.
3.1 Check for Power and Ground at the Valve Connector Safety First: Ensure the ignition is off before disconnecting the valve connector. Once disconnected, you may need to turn the ignition to the "ON" position (engine off) to test for power. Consult your service manual for the correct pinout and expected voltage. Power Wire: Using your multimeter set to DC Volts, place the red probe on the suspected power wire pin at the *harness side* of the connector and the black probe on a known good ground (e.g., battery negative terminal or a clean metal part of the engine block). You should see battery voltage (around 12V). Ground Wire: Place the red probe on the battery positive terminal and the black probe on the suspected ground wire pin at the *harness side* of the connector. You should see battery voltage (around 12V). This indicates a good ground connection. Signal Wire (if applicable): Some valves have a signal wire from the ECU. Testing this can be more complex and might require an oscilloscope or specific diagnostic tools. 3.2 Resistance Check of the Valve Motor (Advanced) Engine Off: Ensure the engine is off and the valve connector is disconnected. Multimeter Setting: Set your multimeter to Ohms ($\Omega$). Test Pins: Place the probes on the two pins of the Engine Coolant Control Valve itself (not the harness). Expected Reading: You are looking for a specific resistance value. This value varies greatly by manufacturer and component. You MUST consult your Toyota service manual for the exact specified resistance range for the 16342-F0010 valve. If the resistance is outside this range (e.g., infinite resistance for an open circuit, or very low resistance for a short circuit), the valve motor is likely faulty. Note: If the valve has more than two pins, you might be testing a motor and a sensor. Again, refer to the service manual. ➡️ Step 4: What to Do Next Clear the Code: After performing any repairs or checks, use an OBD-II scanner to clear the DTC. Test Drive: Drive the vehicle under various conditions to see if the code returns. Code Returns: If the P16B319 code returns after all these checks, it strongly suggests that the Engine Coolant Control Valve (Toyota Part No: 16342-F0010) itself is faulty and needs replacement. The "current above threshold" often points to an internal short or binding within the valve's motor. Professional Help: If you're still stuck or uncomfortable performing these checks, it's always best to take your vehicle to a qualified Toyota mechanic or a reputable repair shop. They have specialized diagnostic tools and expertise to pinpoint the exact cause.